How to make papier-mâché: a beginner's guide from paste to a finished shape
My first papier-mâché bowl collapsed into a damp, grey slump that smelled faintly of a school cloakroom. I'd slapped on thick, sodden layers all in one go, left it somewhere airless, and come back two days later to something closer to porridge than pottery. It was, I now know, a textbook set of beginner mistakes — and every one of them is easy to avoid.
Once your piece is dry and smooth, the fun part begins — see the companion guide, How to decorate papier-mâché, for paint, pattern and finish.
Here's the good news: papier-mâché is about the cheapest, most forgiving craft there is. Torn paper, a bit of paste you can mix in a bowl, and something to drape it over — that's genuinely all it takes. There's only one rule that really matters, and once you know it, your pieces come out hard, light and sound. This guide takes you from a pile of newspaper to a finished, paintable shape.
What papier-mâché actually is
Papier-mâché — French for “chewed paper” — is paper softened with a wet adhesive, layered or moulded over a form, and left to dry into a hard, light shell. That's the whole idea. As the water leaves, the paste and paper fibres lock together into something surprisingly strong for its weight.
Despite the French name, the craft is ancient and well-travelled. Papermakers in China were layering and lacquering paper into helmets and objects as far back as the Han dynasty, and the technique spread westward through Persia and Kashmir, where it became a refined, lacquered art form. It reached a European peak in the Georgian and Victorian periods, when British workshops turned out everything from trays to actual furniture. You're joining a very old craft with a very short shopping list.
What you'll need
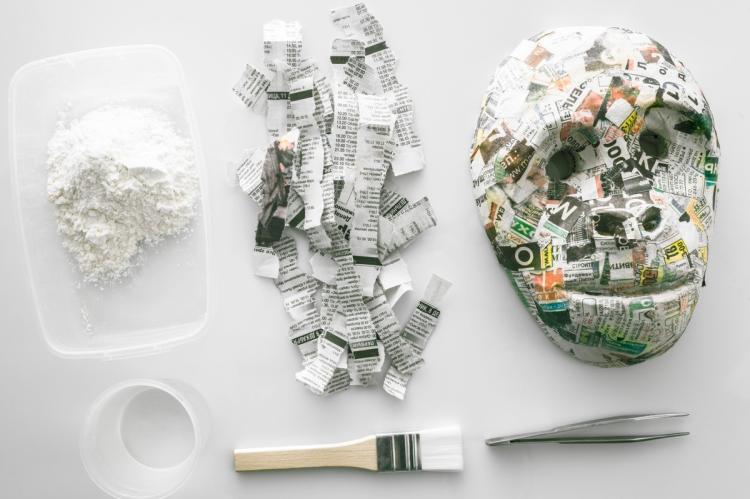
Almost all of it is already in your house:
- Paper — newspaper is the classic (it's thin and soaks paste well); torn-up kitchen paper, brown paper or printer paper also work. Tear it into strips or small pieces rather than cutting, as torn edges blend together more smoothly.
- Paste — flour and water, or PVA (white glue) and water (recipes below).
- A form to build on — a balloon, a bowl, a cardboard tube, a ball of scrunched newspaper, or crumpled foil taped into a shape.
- A release agent — a thin smear of petroleum jelly, or a layer of cling film, so the dry shell lifts off the form.
- A bowl, an old brush, and newspaper to protect the table.
Making the paste
You have three easy routes, each with a different trade-off.
Flour and water (the classic). Whisk roughly 1 part plain flour to 2 parts water until it's smooth and about the consistency of pancake batter, adding a little more water or flour to adjust. Stir in a pinch of salt — it helps hold off mould — and, if you want a stronger, smoother paste, warm it gently on the hob until it thickens, then let it cool. Cheap, safe and perfect for a first go.
PVA (white glue) and water. Mix PVA with water at about 1:1. It dries faster, smoother and tougher than flour paste, and it's more water-resistant — worth it for a piece you want to last.
Methyl-cellulose (craft “wallpaper” paste). Mixed from powder (around 1 part to 16 parts water), it's smooth, non-toxic and naturally mould-free, which makes it a favourite for anything that'll take a while to build. Note it isn't waterproof.
As one seasoned crafter might tell you, the paste matters far less than the patience — any of these works beautifully if you don't rush the drying.
Two ways to build: strips or pulp
There are two methods, and beginners should start with the first.
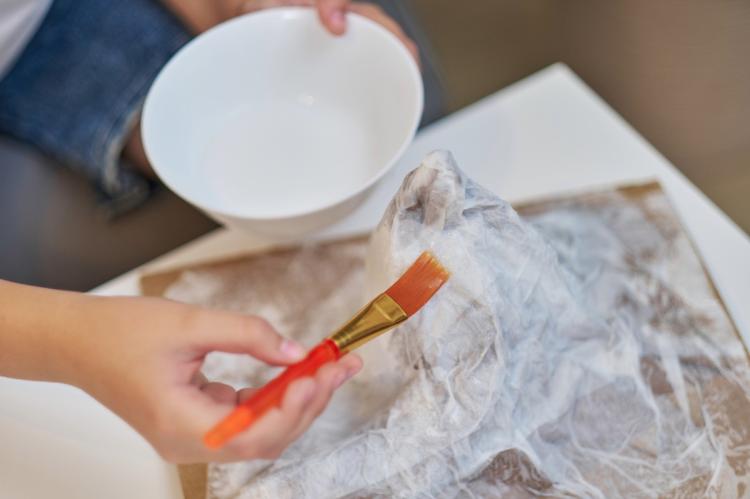
The strip (layering) method. Dip a torn strip in paste, pull it between two fingers to squeeze off the excess — it should be coated, not dripping — and lay it onto your form. Overlap strips, and change their direction with each new layer (horizontal, then diagonal, then horizontal again) so the shell gains strength evenly. Three to five layers is plenty for most pieces.
The pulp method. Soak shredded paper in hot water, squeeze most of the water out, then mix in paste (or PVA) to make a soft, mouldable pulp you can model like clay. It's better for solid, sculpted shapes than for hollow ones, and it takes much longer to dry. Save it for later.
Building your piece over a form
Smear your form with a thin layer of petroleum jelly, or cover it in cling film, so the finished shell will release. Then lay on your first layer of pasted strips, overlapping as you go.
The secret to a clean result is thin, even layers — resist the urge to pile paper on thickly to finish faster. A thick, wet wad traps moisture inside, which is exactly what breeds mould and leaves the middle soft. For a smooth, paint-ready surface, make your final layer plain white paper (kitchen paper or printer paper) so you're not painting over newsprint.
Drying — and the one rule that beats mould
Here it is, the rule the whole craft turns on: let each layer dry completely before you add the next.
Papier-mâché doesn't set chemically; it dries by water evaporating, so it needs air and time. A thin flour-paste layer typically takes somewhere in the region of a day or so to dry fully, and a thick or multi-layer piece can take several days; good airflow — a spot near an open window, or a fan — speeds it up noticeably. Rushing this is behind nearly every ruined piece.
Mould appears when a piece stays damp too long — thick layers, humid air, or adding a new layer onto one that's still wet underneath. Beat it with the same habits every time: thin layers, a little salt in flour paste, plenty of air, and patience. If a piece feels cold or heavy, it's not dry yet — wait.
Smooth it, then seal it ready to decorate
Once your piece is bone-dry and lifted off its form, run over any rough ridges with fine sandpaper. For a really smooth finish you can skim lumps with a little filler and sand again, but for most first projects a light sand is enough.
Then give it a sealing coat: either a wash of PVA and water at 50:50, or a coat or two of acrylic gesso, which dries hard, fills the surface texture and gives paint something to grip. This is the bridge between a bare papier-mâché shell and a good-looking painted one — and it's where this guide hands over to its companion piece on decorating.
Your first project: a bowl over a balloon
A simple bowl is the ideal first make, using only what's above.
- Blow up a balloon and rest it in a mug or bowl to hold it steady, knot-up.
- Grease the top half with a thin smear of petroleum jelly (the part you'll cover).
- Lay on pasted strips, overlapping, across the greased half — this becomes the bowl. Do one even layer.
- Let it dry completely, then add the next layer. Repeat for 3–4 layers, changing strip direction each time and finishing with white paper.
- Dry fully — a day or more per the last layer — then pop the balloon and ease it away.
- Trim the rim with scissors, sand smooth, and seal with 50:50 PVA or gesso.
That's a finished bowl, built from nothing but paper and paste. It's ready to paint.
When it goes wrong: quick fixes
- Mould or a sour smell: it stayed wet too long. Bin it, and next time use thinner layers, add salt, and dry each layer fully with good airflow.
- Still soft or soggy inside: too many layers at once, or not enough drying time. Stop adding layers; move it somewhere warm and airy to dry out.
- Lumpy, uneven surface: paste too thick or strips overlapped unevenly. Sand when dry, and finish with a smooth white-paper layer next time.
- Shell cracks as it dries: often too-thick pulp or uneven drying — build thinner and dry slowly, away from direct heat.
Clean-up, storage and a word on safety
Clean brushes and bowls with warm water before the paste dries. Leftover flour paste keeps only a few days in the fridge and will eventually go off, so mix small batches. If you use ready-made wallpaper paste, check the label — some contain a fungicide and aren't suitable for young children; choose a paste sold as craft- or child-safe if little ones are helping. Papier-mâché is otherwise a low-risk, low-mess craft, which is much of its charm.
Tear up some newspaper today
You don't need to buy a thing to start. Mix a small bowl of flour and water, tear a sheet of newspaper into strips, and lay a single layer over an upturned bowl. Let it dry. That one layer is the whole craft in miniature — the rest is patience and a few more layers.
This guide is for general educational purposes and reflects craft-educator and museum sources; it isn't professional conservation advice. The expert observations here are illustrative — the kind of thing an experienced crafter would say — not quotations from a named individual.
FAQ
Flour paste or PVA — which is better? Flour is cheapest and perfect to learn on; PVA dries tougher, smoother and more water-resistant for pieces you want to keep.
Why did mine go mouldy? It stayed damp too long. Thin layers, a little salt, good airflow and drying each layer fully will prevent it.
How long until it's dry? Roughly a day per thin layer in good airflow, longer for thick pieces — never rush it.
Is papier-mâché waterproof? No — it's porous by nature. Even sealed and varnished it's only water-resistant, and never watertight or food-safe (more on finishing it in the decorating guide).