How to make a mosaic: the beginner's guide that starts in the right place
Most mosaic guides begin with colour and design. The three decisions that actually determine whether your piece survives — substrate, adhesive and grout — usually get a sentence each. Here they get the space they deserve.

My first mosaic was a coaster. I made it in an afternoon, it looked rather sweet, and three weeks later it was a small tray of loose tiles on the hall table.
I hadn't rushed it. I hadn't been careless with the cutting. I simply didn't know that the white craft glue I'd used softens again when it gets damp, and that a coaster is, by definition, a thing that gets wet.
I mention this because the internet is full of mosaic tutorials that lavish attention on the enjoyable part — choosing colours, nipping tiles, the deeply satisfying moment of pushing grout into the gaps — and skate past the dull part. The dull part is the one that decides whether your work lasts.
The good news: the dull part takes about five minutes to understand and costs nothing extra. Choosing the right board and the right adhesive before you stick anything down is free. Finding out afterwards is not.
What a mosaic actually is
A mosaic is a surface decorated with small pieces — tesserae — fixed to a base and joined by a filler that occupies the gaps between them.
That flat definition contains the three layers that matter:
- The substrate: the object or surface you're working on.
- The adhesive: what holds each tessera to the substrate.
- The grout: the paste that fills the joints, binds everything together and gives the piece its finished, continuous look.
Get all three compatible with each other and with wherever the piece will live, and a mosaic will outlast you. Get one wrong and all three fail together.
Five thousand years, and a fair chunk of it in Britain
Mosaic is often described as a Roman invention. The Romans took it to an extraordinary technical peak, but they didn't invent it: the earliest known mosaics are the painted clay cones pressed into temple walls at Uruk in Mesopotamia, around 3000 BC. The Greeks developed pebble mosaics, and cut tesserae followed from there.
Britain has some genuinely world-class survivals. Fishbourne Roman Palace in West Sussex holds the finest collection of in-situ mosaic floors in the country, including the famous Cupid on a dolphin. Bignor and Lullingstone are both worth a day out. And the fourth-century Hinton St Mary mosaic, now in the British Museum, carries what may be the earliest surviving representation of Christ in a British floor.
Across the Channel, the two great pilgrimages are the Villa Romana del Casale in Sicily, with its extraordinary hunting scenes, and the Byzantine mosaics of Ravenna — the point at which mosaic stops imitating painting and becomes something painting can't do. North American readers have better access than they might expect: the mosaics excavated at Antioch in the 1930s were divided among the sponsoring institutions, so substantial holdings sit in Worcester, Baltimore and Princeton.
If you want to see what mosaic looks like when it stops being decorative and becomes architecture, look at Gaudí's trencadís work in Barcelona — broken ceramic fragments laid in irregular patterns. It's also, conveniently, the one mosaic style where irregularity is the point rather than a flaw, which makes it a forgiving place for a beginner to start.
What to use for tesserae
You don't need anything exotic, but it helps to know what you're holding.
- Vitreous glass tiles. Coloured glass, usually 20 mm square (a shade over ¾ in). Stable colours, non-porous, sold in bags and on mesh sheets, and inexpensive. The sensible starting point.
- Glazed ceramic. Easy to nip, hugely varied, cheap. The cut edge shows the biscuit underneath, in a different colour from the glaze.
- Broken china. Plates, cups, old wall tiles. Free, full of character, and inconsistent in thickness.
- Natural stone. Marble and travertine give a soft, matt look. Harder to cut cleanly.
- Smalti. The opaque Italian glass of the classical mosaics. Beautiful and expensive — save it for later.
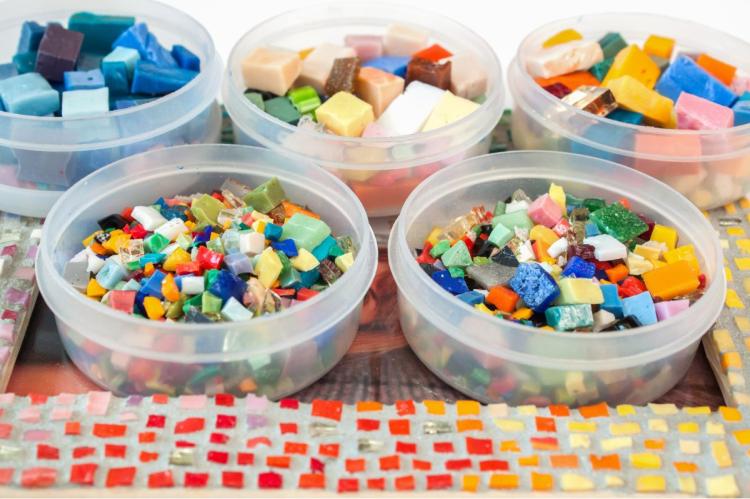
On thickness: mixing wildly different thicknesses in one piece complicates the finish, because grout piles up around the lower tiles. For a first project, stick to one type.
The kit
Everything essential fits in a shoebox:
- Tesserae in two or three colours. More colours won't give you a better design, just a harder one.
- Tile nippers. For glass, wheeled nippers are worth the extra few pounds: they cut by compression and produce far less shatter than straight-jaw nippers.
- Adhesive suited to the project (see below — this is the important bit).
- Grout. Sanded and unsanded versions exist; sanded is stronger and right for joints of roughly 3 mm (⅛ in) and above.
- A spreader or rubber float for the grout.
- A cellulose sponge and clean cotton cloths.
- Pencil or chalk for marking out.
- Safety glasses and a dust mask. Not optional.
- Nitrile gloves. Grout is cementitious and will strip your hands raw.
Choosing the adhesive: this is where mosaics are lost
This is the section that would have saved my coaster.
Indoors and dry — a panel, a mirror frame, a box lid, a picture — good-quality PVA — sold as white craft glue or school glue in North America — works perfectly well. It's clean, dries clear, has no solvent fumes and washes off with water.
Outdoors, anywhere damp, and on floors, PVA is the wrong choice. It's a water-based emulsion: once dry it forms a tough film, but sustained moisture softens it and the bond gives way. You don't need driving rain — ambient humidity in a porch, a bathroom or a conservatory is enough to start tiles dropping off within weeks. For those jobs use flexible cement-based tile adhesive (thinset), polymer-modified if the piece will face frost.
There's a second trap hidden in this. Because PVA re-softens in water, grouting before the adhesive has properly cured means the water in the grout can loosen tiles while you're working on them.
Worth flagging: a lot of older craft leaflets tell you to let the glue set for two hours before grouting. That is far too short. The standard advice among mosaicists is 24 hours minimum, and 48 if the substrate is non-porous or you've been generous with the glue.
The substrate: the failure nobody warns you about
Your adhesive can be perfect and the mosaic can still fail, because the problem was underneath it.
- Timber and MDF: indoors only, and seal first — face, back and edges — with PVA diluted somewhere between one part glue to two parts water and one to three, depending on how porous the surface is. Unsealed, the board drinks water out of the grout, swells, and cracks the joints.
- Terracotta: also porous, also sealed.
- Metal, glass and plastics: non-porous. Key the surface with abrasive paper and degrease with isopropyl alcohol before sticking anything down.
- For anything going outdoors, forget wood entirely. Even marine plywood fails: daily humidity cycles make it expand and contract, which cracks grout and pops tiles. Use cement backer board, concrete or ceramic.
The direct method, step by step
This is where to start. You stick tesserae straight onto the object, face up, seeing the result as you go.
1. Prepare and seal the substrate
Clean it, key it if necessary, seal it if it's porous. Let it dry completely.
2. Draw the design
Pencil or chalk, straight onto the object. If marking it directly makes you nervous, draw it at full size on card and keep it alongside as a reference.
Begin with geometric shapes: bands, squares, chequerboards, simple spirals. Curves and circles need finer cutting, and they'll come.
3. Cut the tesserae
Hold the tile at its edge in the nippers and squeeze progressively. For irregular trencadís-style breaks, put the tile in a strong plastic bag, wrap the bag in a cloth as well, and tap it sharply with a small hammer. The cloth matters — bags split more easily than you'd think.
Glasses on regardless, even when cutting inside a bag.
4. Dry-lay it
Position everything without glue and look at the whole thing. This step seems skippable and prevents more disappointment than any other.
It's also where andamento comes in — the direction in which lines of tesserae flow. In mosaics that work visually, the tiles follow the contours of the shapes rather than sitting in rigid rows that ignore the drawing. It's the difference between a mosaic and a tiled surface.
5. Glue
Start at the focal point, then do the border if there is one, then fill the background.
Put a small dab of adhesive on the back of each tessera, not on the substrate. Sparingly: excess squeezes up into the joints, takes up space the grout needs, and is a nuisance to clean once it's set.
Keep the spacing consistent — around 2 to 3 mm, call it a generous ⅛ in. Uneven joints are far more visible once grout fills them.
6. Wait 24 hours
Lay it flat, and if the board is thin, put an evenly distributed weight on top to stop it bowing.
The indirect method: when you need a dead flat surface
It's called indirect because you can't see the face of the work while you're making it. It gives you a perfectly level surface even when tesserae vary in thickness, and it lets you build large mosaics at a table and install them afterwards.
In the classical version, tesserae are glued face down onto kraft paper with a water-soluble adhesive. Once the design is assembled, you spread the permanent adhesive on the substrate, flip the whole sheet onto it, press it home, and — once it's set — dampen the paper and peel it away. The face appears, flat and level.
There's a more manageable variant, the mesh method: tesserae are glued face up onto fibreglass mesh, left to dry, and the whole sheet is transferred to the final substrate.
It's an excellent technique, but it means planning your design in mirror image and trusting a result you can't see. Save it for your third or fourth project.
Grouting: the step that transforms everything
Grouting is the moment a collection of stuck-down fragments becomes, abruptly, a mosaic. It's also where most people panic, because for a few minutes the piece looks dreadful. That's normal.
- Put the mask on before you open the bag. Dry grout powder contains crystalline silica and you don't want it in your lungs. Mix outdoors or somewhere well ventilated.
- Follow the manufacturer's water ratio. You're aiming for a thick paste — Greek yoghurt, or cake batter. Too much water gives a porous grout that shrinks, cracks and stains; too little won't fill the joints.
- Let it stand for about ten minutes, then stir again before use.
- Spread it with a float or gloved hands, working diagonally so the paste is pushed into every gap. Work in sections.
- Scrape off the excess and wait fifteen to twenty minutes.
- Clean with a well-wrung sponge, rinsing often. A dripping sponge washes grout back out of the joints.
- Polish off the haze — that matt film on the tiles — with a dry cotton cloth. Not kitchen roll; it sheds fibres into the joints.
- Let it cure for 48 to 72 hours before using or sealing the piece.
On colouring grout
Some people add acrylic paint to white grout. It works, with two conditions: use small quantities, and mix all the grout the piece will need in a single batch, because matching the shade in a second batch is effectively impossible.
For a more predictable result there are proper grout pigments and pre-coloured grouts. Whichever you use, test on a few spare tiles first — wet grout and cured grout are noticeably different colours.
Where to find your materials
Craft chains and online mosaic specialists sell vitreous glass by the bag, and either is fine for a first project. Tile shops will often give away or sell off cracked stock and discontinued sample boards, which is an excellent source of ceramic — worth asking, because it usually costs nothing. Second-hand shops are the obvious hunting ground for china: charity shops in Britain, brocantes and mercadillos across much of Europe, thrift stores in North America.
For backer board, adhesive and grout, skip the craft supplier entirely. A builders' merchant or DIY warehouse — a hardware store or home centre if you're in the US — sells the identical products for less and in more useful quantities.
The five most common beginner mistakes
- Designing something too complicated. A well-executed two-colour chequerboard beats an ambitious landscape that hasn't quite worked.
- Too much glue. It squeezes up, fills the joint and shows.
- Grouting too soon. Twenty-four hours, minimum.
- Not working on a tray. A tray lets you move an unfinished piece without dismantling it, and keeps cut tiles together.
- Sweeping up by hand. Glass and ceramic shards cut badly. Dustpan and brush, or a vacuum.
Safety, properly
- Safety glasses and a dust mask whenever you cut or break tesserae.
- A mask for mixing dry grout too, not just for cutting.
- Gloves while grouting.
- Ventilation when mixing cementitious products.
- Thorough clean-up of the work area afterwards.
- If you make a mosaic tray or worktop, don't use it for direct food contact: grout joints are porous, and glazes on old china can contain lead.
Projects to start with
Roughly in order of difficulty:
- Coasters (indoor, dry) — the ideal test piece.
- A mirror or picture frame — flat, forgiving, and immediately impressive.
- A decorative tray — a good size for practising andamento.
- A terracotta pot — sealed, and with cement adhesive if it's going outside.
- Candle holders, box lids, house numbers, a small table top.
If you make a mirror frame: mask the edge of the glass with tape before you start. Both cementitious grout and acetic-cure silicone attack the silvered backing, leaving dark irreversible blooms right around the perimeter — exactly where they show most. If you need to fix anything directly onto the glass, use a neutral-cure silicone.
Once you've got the feel of it: benches, garden tables, murals. That's when backer board and cement adhesive become non-negotiable.
If a tessera comes loose
It happens, usually to a piece on an edge or corner, and it isn't a disaster.
Pick out the old adhesive down to the substrate with a craft knife, and clear any grout from the sides of the gap. For a single tile on an indoor piece, a two-part epoxy is the right repair rather than more PVA: it fills the void left by the old adhesive and cures rigid. Let it set fully, then work a small amount of matching grout into the joints with a fingertip and wipe back.
If tiles are coming away in numbers rather than one at a time, the adhesive or the substrate was wrong for where the piece lives, and patching will only postpone the argument.
In short
- Indoor and dry → PVA. Outdoor or damp → cement-based adhesive. There's no comfortable exception.
- Always seal porous substrates, front and back.
- Wait 24 hours before grouting, not two.
- Start geometric, with two or three colours.
- Glasses and mask, every time.
My second coaster is still on the same hall table, six years on. The difference wasn't skill. It was ten minutes of reading about adhesives.
This article is for general guidance. Work in a well-ventilated space, follow the manufacturer's instructions for every product you use, and wear eye and respiratory protection when cutting tesserae or handling powdered materials. If your project is destined for outdoors, a wet area or a trafficked surface, take professional advice on suitable materials.